环境说明:

springboot:2.2.7

jdk:1.8.0

maven:3.6.3

在平时的项目中,我们用到了 spring boot 默认的插件 spring-boot-maven-plugin 来进行打包,打的包是直接可执行的。但是这次,有一个多模块项目,我负责其中一个模块的开发,开发完成之后,发现打的包直接执行报找不到主类,这就有点奇怪了,所以就有了这篇文章。

让我们一起系统地总结下如何打成可执行 jar 包,另外也分享一下企业经常用的打包方式。

一、打成可执行jar包

如果你的项目工程,不能制作为可执行 jar 包,即执行 java -jar xxx.jar 报错,可以尝试下我的 pom 配置。

pom 关于打包的配置如下所示:

1
2
3
4
5
6
7
8
9
10
11
12
13
14
15
16
17
18
19
20
21
22
23
24
25
26
27
28
29
30
31
32
33
34
35
36
37
<properties>
<!-- 项目编译的编码格式,建议加上 -->
<project.build.sourceEncoding>UTF-8</project.build.sourceEncoding>
<!-- 项目编译打包时,只跳过对测试类的执行,编译打包照做 -->
<skipTests>true</skipTests>
</properties>

<build>
<plugins>
<!-- spring-boot:repackage,默认goal。在mvn package之后,再次打包可执行的jar/war,同时保留mvn package生成的jar/war为.origin -->
<plugin>
<groupId>org.springframework.boot</groupId>
<artifactId>spring-boot-maven-plugin</artifactId>
<version>2.2.7.RELEASE</version>
<configuration>
<!-- 添加启动类 -->
<mainClass>com.xxx.xxx.DataCenterProxyApplication</mainClass>
</configuration>
<executions>
<execution>
<goals>
<goal>repackage</goal>
</goals>
</execution>
</executions>
</plugin>
<!-- 指定编译版本,建议加上 -->
<plugin>
<groupId>org.apache.maven.plugins</groupId>
<artifactId>maven-compiler-plugin</artifactId>
<configuration>
<source>1.8</source>
<target>1.8</target>
</configuration>
</plugin>
</plugins>
</build>

一般 spring boot 工程会自带 spring-boot-maven-plugin 这个插件,它是继承的父工程 spring-boot-starter-parent 的 spring-boot-maven-plugin 插件,父 pom 中的 spring-boot-maven-plugin 插件定义为:

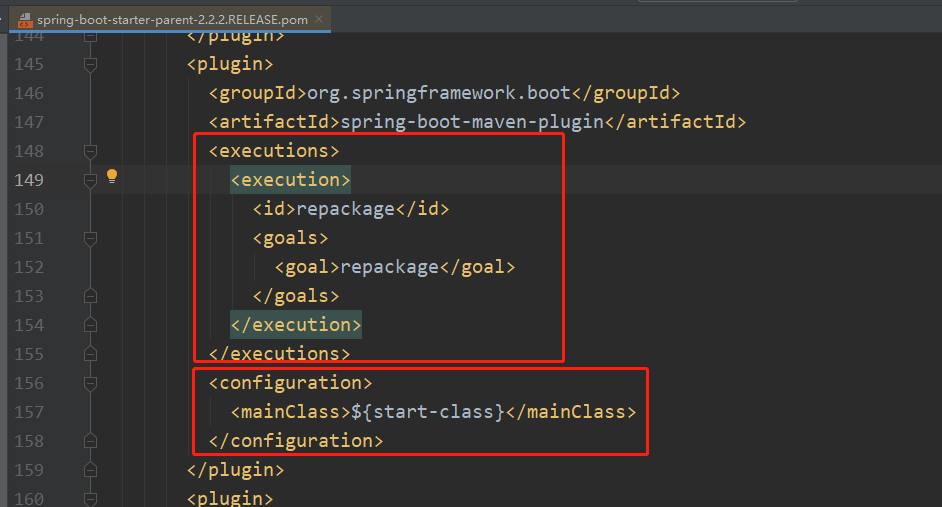
如果在项目 pom 文件中,没有继承 spring-boot-starter-parent 的话,那么 spring-boot-maven-plugin 插件就没有了继承关系,所以只能自己手动指定主类加载,手动设置 goal 为 repackage 。

设置好以后,通过 idea 工具可以看到 maven 中包含了 spring-boot-maven-plugin 插件:
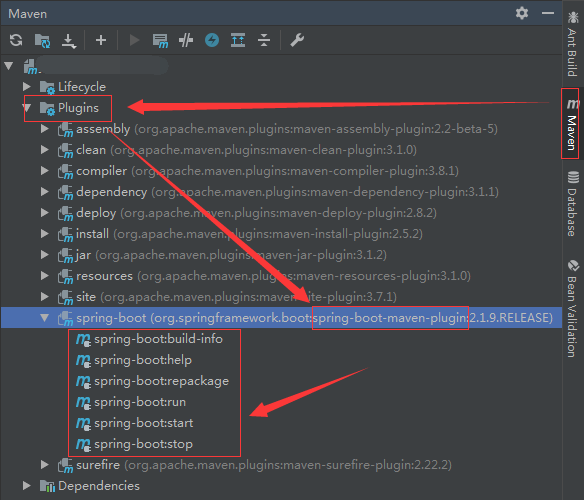
功能说明:

  • build-info:生成项目的构建信息文件 build-info.properties
  • repackage:这个是默认 goal,在 mvn package 执行之后,这个命令再次打包生成可执行的 jar,同时将 mvn package 生成的 jar 重命名为 *.origin
  • run:这个可以用来运行 Spring Boot 应用
  • start:这个在 mvn integration-test 阶段,进行 Spring Boot 应用生命周期的管理
  • stop:这个在 mvn integration-test 阶段,进行 Spring Boot 应用生命周期的管理

打出来的可执行 jar 包,目录结构为:

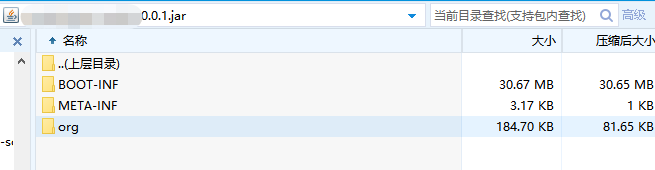
其中 BOOT-INF 主要是一些启动信息,包含 classes 和 lib 文件,classes 文件放的是项目里生成的 class 字节文件和配置文件,lib 文件是项目所需要的 jar 依赖。

META-INF 目录下主要是 maven 的一些元数据信息,MANIFEST.MF 文件内容如下:

1
2
3
4
5
6
7
8
9
10
Manifest-Version: 1.0
Implementation-Title: spring-xxx-project
Implementation-Version: 0.0.1
Start-Class: com.example.CustomApplication
Spring-Boot-Classes: BOOT-INF/classes/
Spring-Boot-Lib: BOOT-INF/lib/
Build-Jdk-Spec: 1.8
Spring-Boot-Version: 2.2.2.RELEASE
Created-By: Maven Archiver 3.4.0
Main-Class: org.springframework.boot.loader.JarLauncher

其中 Start-Class 是项目的主程序入口,即 main 方法。Springboot-Boot-Classes 和 Spring-Boot-Lib 指向的是生成的 BOOT-INF 下的对应位置。

这样的 jar 包,我们可以直接使用 java -jar xxx.jar 命令来启动。

二、企业经常用的打包方式

其实在大数据项目中,用的打包插件以 maven-assembly-plugin 居多,因为大数据项目中往往有很多 shell 脚本、sql 脚本、.properties 及 .xml 配置项等,采用 assembly 插件可以让输出的结构清晰而标准化

1、项目目录

2、pom 文件依赖

1
2
3
4
5
6
7
8
9
10
11
12
13
14
15
16
17
18
19
20
21
22
23
24
<plugin>
<groupId>org.apache.maven.plugins</groupId>
<artifactId>maven-assembly-plugin</artifactId>
<version>2.5.5</version>
<configuration>
<encoding>utf-8</encoding>
<appendAssemblyId>false</appendAssemblyId>
<descriptors>
<!-- 配置描述符文件 -->
<descriptor>src/main/build/package.xml</descriptor>
</descriptors>
</configuration>
<executions>
<execution>
<id>make-assembly</id>
<!-- 绑定到package生命周期 -->
<phase>package</phase>
<goals>
<!-- 只运行一次 -->
<goal>single</goal>
</goals>
</execution>
</executions>
</plugin>

3、集成过程(package.xml)

1
2
3
4
5
6
7
8
9
10
11
12
13
14
15
16
17
18
19
20
21
22
23
24
25
26
27
28
29
30
31
32
33
34
35
36
37
38
39
40
41
42
43
44
45
<?xml version="1.0" encoding="UTF-8"?>
<assembly>
<!--打包名称,唯一标识-->
<id>package</id>
<!--打包格式,可以手动修改-->
<formats>
<format>tar.gz</format>
</formats>
<!--根目录-->
<baseDirectory>data-xxx-xxx</baseDirectory>
<!--文件设置-->
<fileSets>
<fileSet>
<!--目标目录,会处理目录里面的所有文件-->
<directory>src/main/bin</directory>
<!--相对于打包后的目录-->
<outputDirectory>bin</outputDirectory>
<!--文件过滤-->
<includes>
<include>*.*</include>
</includes>
<!--文件权限-->
<fileMode>0755</fileMode>
<!--如果是脚本,一定要改为unix.如果是在windows上面编码,会出现dos编写问题-->
<lineEnding>unix</lineEnding>
</fileSet>
<fileSet>
<directory>src/main/resources</directory>
<outputDirectory>conf</outputDirectory>
</fileSet>

<fileSet>
<directory>logs</directory>
<outputDirectory>logs</outputDirectory>
</fileSet>
</fileSets>
<dependencySets>
<dependencySet>
<!-- 将项目所有依赖包拷贝到发布包的lib目录下 -->
<outputDirectory>lib</outputDirectory>
<!-- 符合runtime作用范围的依赖会被打包进去 -->
<scope>runtime</scope>
</dependencySet>
</dependencySets>
</assembly>

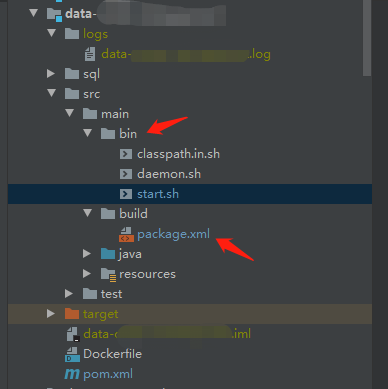
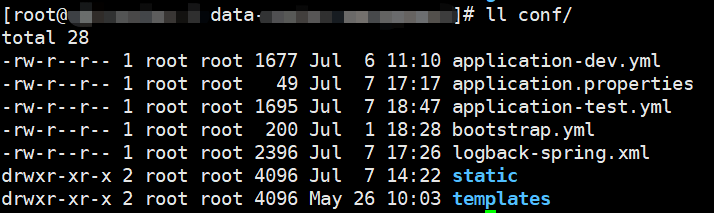
按照以上配置打包好后,将 .tar.gz 文件上传到服务器,解压之后就会得到 bin、conf、lib 等规范化的目录结构,十分方便。

4、打包后 .tar.gz 解压后的目录

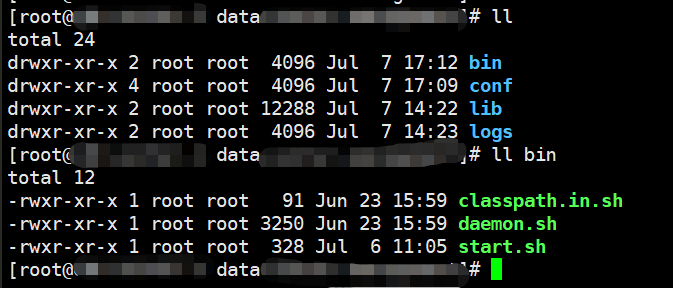
解压完以后,可以执行 bin 目录下的 start.sh 脚本来启动服务。启动 jar 包的命令如下:

1
java -Xmx800m -Xms512m -cp :/opt/xxx/lib/*:/opt/xxx/conf com.example.CustomApplication

三、后续

但是在使用过程中,我发现修改 conf 里面的 yml 配置文件没有生效:

经过排查之后才发现,生成的 jar 包文件中,有相关 yml 文件,所以修改 conf 目录才会不生效。

那我们应该在打 jar 包的时候,将相关配置文件给排除掉,这样,启动的时候再指定 conf 目录就可以实时读取 conf 目录的配置了。

我们可以使用 maven-jar-plugin 插件来设置排除文件:

1
2
3
4
5
6
7
8
9
10
11
12
13
<plugin>
<groupId>org.apache.maven.plugins</groupId>
<artifactId>maven-jar-plugin</artifactId>
<version>3.0.2</version>
<configuration>
<excludes>
<exclude>*.conf</exclude>
<exclude>*.yml</exclude>
<exclude>*.xml</exclude>
<exclude>*.properties</exclude>
</excludes>
</configuration>
</plugin>

上述配置在打 jar 包时,就排除了 resources 目录下的 conf、yml、xml、properties 文件。

然后项目再重新打包,将生成的 jar 包替换到 lib 目录下即可。

这时候修改 conf 的配置文件后,再启动 jar 包,配置就会直接生效了。

四、总结

1、如果需要打成可执行 jar 包的话,可以使用 spring boot 的打包插件:spring-boot-maven-plugin 。

2、不过还是推荐第二种打包方式,因为使用很方便,特点如下:

  • 可以将 jar 包操作脚本写入到 bin 目录下,方便程序的启动与停止。
  • 将配置文件与 jar 包解耦,如果需要修改配置文件(比如 application-test.yml、logback-spring.xml)的话,直接修改 conf 目录,然后重启 jar 包即可(前提是需要将 jar 包里面的配置文件给排除掉)。
  • 目录层级明显,依赖的 jar 包都在 lib 目录下。

本文已将第二种打包方式上传到 github ,地址为:https://github.com/841809077/spring-boot-model.git ,欢迎 star 。